This article is part of a series of 5 about undo/redo:
- Announcement and introduction
- Getting started – tutorial
- Logical operations, scopes, naming
- Recorders, recorder providers, callbacks
- Case study: Visual Designer
NOTE: This blog post is about an available pre-release of PostSharp. You can install PostSharp 4.0 only using NuGet by enabling the “Include pre-release” option. Undo/Redo is implemented in the package PostSharp.Patterns.Model.
Undo/Redo Fast Track
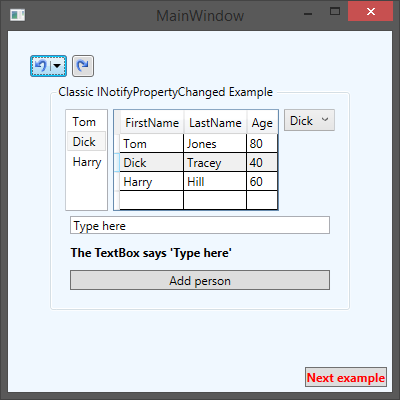
For this post, I will use a popular sample application from Visual Studio Gallery: “Easy MVVM Example”. You can create a new project based on this project yourself easily; just open the New Project dialog in Visual Studio, select the Online tab, and search for the sample named “Easy MVVM Example”.
Step 1. Install NuGet packages
Go to the NuGet package manager dialog and add the pre-release package named PostSharp.Patterns.Model.Controls. This will add all dependent packages. Remember to display pre-release packages and not only stable ones.
Step 2. Clean up INotifyPropertyChanged
The sample was not written for PostSharp, so it has its custom INotifyPropertyChanged (INPC) implementation. We would need to write additional code to have our undo/redo feature work with their hand-written INPC, so let’s just clean the project and replace their implementation with our own.
To proceed, find the file Person.cs and replace it with the following content:
using PostSharp.Patterns.Model;

namespace MvvmExample.Model
{
    [NotifyPropertyChanged]
    public class Person
    {
        public string FirstName { get; set; }
        public string LastName { get; set; }
        public int Age { get; set; }
    }
}
This incidentally removes 75% of boilerplate code.
Step 3. Make the Person class recordable
Add the [Recordable] attribute to the Person class.
The code becomes as follows:
using PostSharp.Patterns.Model;
using PostSharp.Patterns.Recording;

namespace MvvmExample.Model
{
    [NotifyPropertyChanged]
    [Recordable]
    public class Person
    {
        public string FirstName { get; set; }
        public string LastName { get; set; }
        public int Age { get; set; }
    }
}
Step 4. Add undo/redo buttons to XAML
-
Open the MainWindow.xaml file.
-
Add the following namespace definition to the root <Window> tag:
xmlns:model="clr-namespace:PostSharp.Patterns.Model.Controls;assembly=PostSharp.Patterns.Model.Controls"
-
Add the following controls before the closing </Window> tag.
<model:UndoButton HorizontalAlignment="Left" Margin="22,24,0,0" VerticalAlignment="Top" />
<model:RedoButton HorizontalAlignment="Left" Margin="64,24,0,0" VerticalAlignment="Top"/>
At this point, you can start the application and try to modify a data grid cell and try clicking the undo and redo buttons.

Interacting with the Recorder manually
In the previous section, we just inserted the UndoButton and RedoButton controls into our XAML code. If you want more control, you can access the Recorder class directly from C# code.
In this example, we are using a global Recorder object. You can get a reference to this instance from the RecordingServices.DefaultProvider class. This class provides the following members:
-
UndoOperations and RedoOperations collections: give access to operations that can be undone or redone. Operations are objects derived from the Operation class. This class has a Name property, which is the human-readable name of the operation.
-
Clear : remove all operations both from the UndoOperations and RedoOperations collection.
-
CanUndo and CanRedo properties: determines whether the Undo or Redo commands are available.
-
Undo and Redo methods: undo or redo one operation
-
AddRestorePoint method: creates a restore point, which basically is an empty operation that serves as a marker.
-
CanAddRestorePoint property: determines if the AddRestorePoint command is available
-
UndoTo and RedoTo methods: undo or redo all operations from the now to a given operation or restore point.
-
MaximumOperationsCount property: maximum number of operations in the UndoOperations collection before old operations are removed.
The Recorder class also has other methods and properties that will be explained in a later post.
Example
Let’s see how we can manually interact with the Recorder in practice.
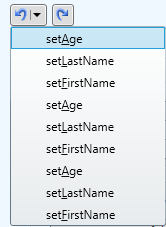
If you click on the arrow of the Undo button just after the application started, you will see that the operation list is already populated with nine items. These operations were created during the application initialization.

If we don’t want users to be able to undo these operations, we can clear the Recorder at initialization. Go to the ViewModelMain class and append the following instruction to the constructor:
RecordingServices.DefaultRecorder.Clear();
Now, when you start the demo application, you will see that the undo and redo buttons are initially disabled.
Summary
Adding the undo/redo feature to your application can be dead easy if you already have a well-structure code, with a nice separation between the UI and the model. Basically, all you need to do is to make your model recordable, then drop the undo and redo buttons to your toolbar.
Of course, no real-world piece of software is so simple than a demo application, and I would not like you to believe that implementing Recordable is always so trivial. Yet, our implementation of the Recordable pattern makes it possible to customize the behavior to your needs.
In the next blog post, we’ll go deeper and see how you can control the creation and naming of operations.
Happy PostSharping!
-gael
UPDATE: Change product version from PostSharp 3.2 to PostSharp 4.0.
