Improving Your Team's Productivity Through Consistent Code Style
While it may seem trivial, the first step towards fostering a maintainable, team-friendly codebase is reaching a consensus on code style and ensuring its strict enforcement. This includes code formatting (spaces, blank lines, parentheses, and brackets), naming (casings, prefixes, suffixes, etc.), and usage of this, var and more. The ultimate goal? Make running a full automated clean-up on your codebase a routine task. In this article, I explain the practices we are following on the Metalama team. After all, since we are building tools that help C# developers write better quality code, it’s only logical that our own code is of the highest possible quality. Don’t take my words for granted: our source code is available on GitHub, so you can check for yourself if we live up to our standards.
Code Style As a Philosophy
You might be wondering, why all the fuss about code style? Let’s highlight two main reasons:
-
A consistent style makes code easier to read. Since developers typically spend 80% of their time reading code, code quality is one of the most important factors for the long-term productivity of your team. There are tools, like ReSharper’s Virtual Formatter, that can help with reading code in a consistent style while you are in the IDE, but that doesn’t solve the issue in other places where code is read, such as your Git repository.
-
A uniform code style simplifies pull requests and merges. Have you ever been frustrated by irrelevant changes appearing in a PR diff because a developer ran a code cleanup? This annoyance could’ve been avoided if the code style had been adhered to from the start. Consistent code style also minimizes merge conflicts. One of the objectives of the code quality pipeline is that everybody should be able to reformat the entire codebase without causing a revolution in the team – as long as it’s done in a separate PR of course. In other words, complete reformatting should be a non-event.
Step 1. Achieving Consensus on Code Style
While coding style can be a matter of preference, it’s crucial that everyone on the team aligns with a chosen convention. Everyone will have their own opinion, which can easily lead to endless and heated debates. Your main objective here is to get through the consensus-building process as soon and quickly as possible.
- I suggest starting with Microsoft’s common coding convention for C#. It’s a solid starting point, widely accepted by the C# community, but it doesn’t cover every detail.
- At the beginning of the project, you might still find yourselves in lengthy discussions. Don’t dismiss these debates: it is better to have them sooner than later. Listen to all arguments swiftly, remind everyone that the emphasis is not on the chosen style itself, but on making an unambiguous decision that will be consistently applied. Ensure everyone is aware of the bikeshedding dynamics in collective decision-making. Then, let the most experienced developer make the final call.
Remember, deciding on a coding style is an iterative process. Don’t spend too much time on this step—you’ll revisit it later.
Step 2. Configuring Your IDE
Next, you need to configure your coding style in the IDE.
Configuring Code Formatting
To keep everyone on the same page, store the coding style configuration in the source repository, not in the user profile. This file is typically named .editorconfig. The EditorConfig format is supported by Visual Studio, ReSharper, Rider, and many other editors.
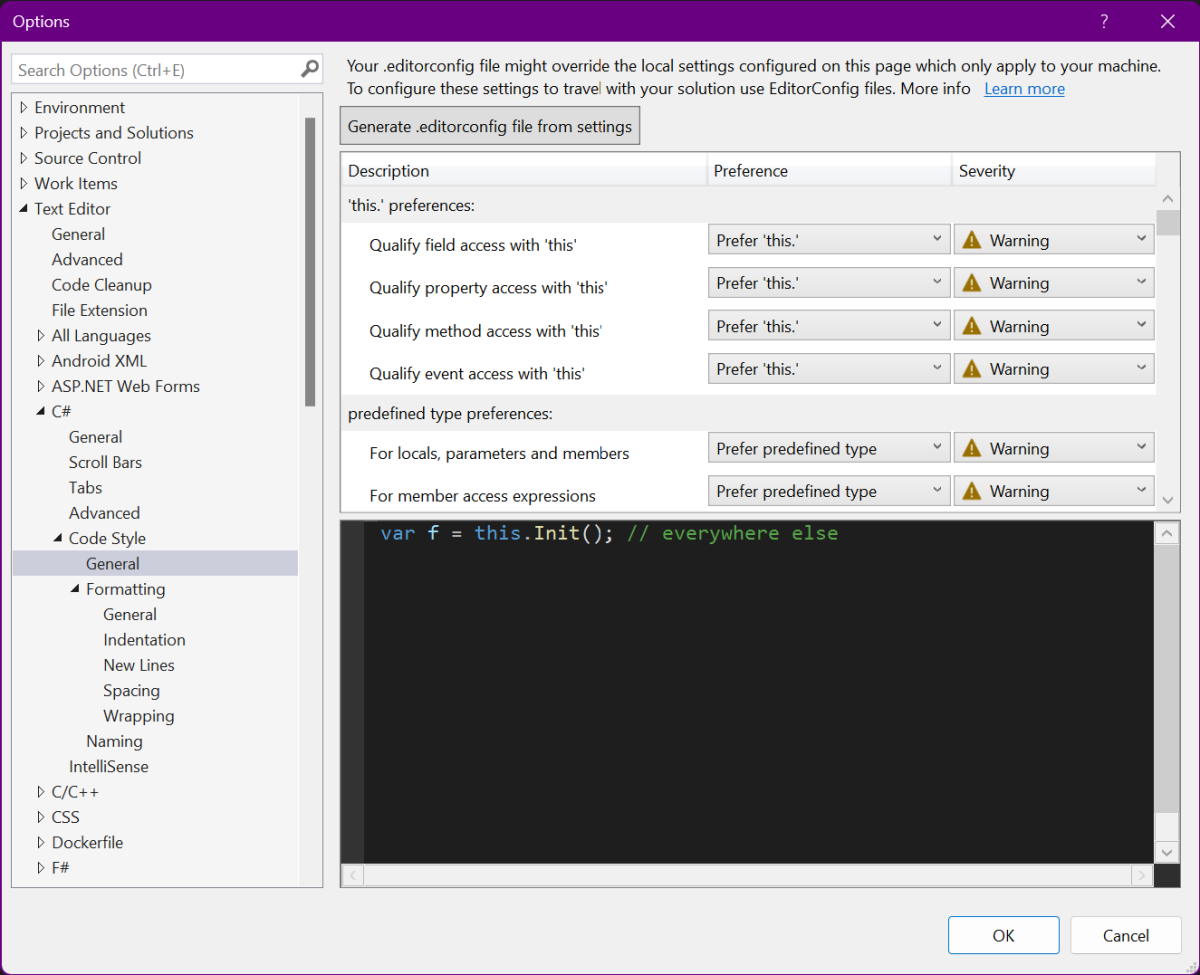
Here’s how you can use the Code Style editor in Visual Studio:

Your code style configuration should be thorough and specific, leaving no room for personal interpretations. I recommend setting the severity to warning whenever practically possible. Some formatting rules are brittle because they can be easily broken if you have #if clauses in your code. On our team, we turn off any brittle rules. We only enforce code formatting in the Debug build configuration because having a zero-warning codebase for all platforms and all configurations is very cumbersome for minimal benefits.
In addition to .editorconfig, we also use JetBrains’ tools due to their superior code formatting and cleanup capabilities. We set up a team-shared layer in Rider to ensure the Rider configuration is stored in the source repository. Instead of the *.sln.DotSettings file, I choose a different layer file that can be imported from all solutions in the repository.
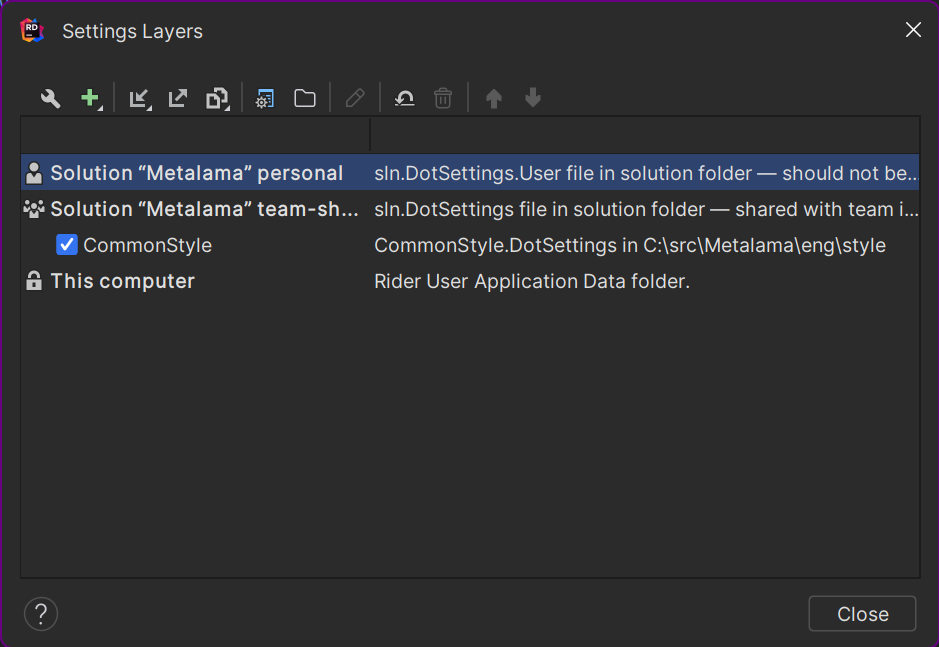
In addition to .editorconfig, we also use JetBrains’ tools due to their superior code formatting and cleanup capabilities. Here’s the Rider settings dialog:
In our team, we set up the same team-shared layer in Rider in each solution to ensure the Rider configuration is stored in the source repository. So instead of the *.sln.DotSettings file, we create a different layer file that can be imported from all solutions in the repository. To access layers, click on the Managed Layers at the left bottom corner of the settings dialog.

When the layer is created, make sure to save your code style changes into the proper layer. It’s a good practice for team members to reset their code style settings in both personal layers.
Feel free to copy our .editorconfig and Rider settings.
Configuring Code Cleanup
Now that you have set up your code formatting preferences, the next step is to configure a code cleanup profile.
I suggest adding all harmless fixers, i.e., those that make minor syntax changes and, most importantly, are 100% bug-free. For example, include Apply parenthesis parameters and Add this qualifications, but not Make field readonly because this analysis sometimes makes mistakes. The ultimate goal is to be able to use your IDE’s clean up feature confidently and without any manual tweaking afterward, so I would avoid any risky fixer.
Unfortunately, Visual Studio does not allow saving cleanup profiles in source control. Ideally, all team members should use the same profile. While Visual Studio offers a cleanup on save option, I am not using it because it sometimes has bugs, and when it does, you have no way at all to fix them except by opening your file in another editor than Visual Studio.
Rider, on the other hand, allows to store the clean-up profile in the team-shared settings layer. Instead of format-on-save, Rider can automatically perform a code cleanup before each commit. I personally don’t use this feature because I always use Rider for git commits. Besides, since some of my teammates prefer Visual Studio, we need a vendor-neutral solution.
Step 3. Reporting Warnings for Style Violations
Remember that our goal is to improve the team’s productivity, both in the short and long terms. If your process is too lax, your code quality will degrade, and you will hamper your long-term productivity. However, if your process is too strict, any build or pull request could become a nightmare.
Therefore, it’s essential to find a good balance. We’ve found the following compromise to work well for us:
-
As I said before, we set the severity of most code style violations to warning. For instance, our coding style requires all instance members to be qualified with
this, which translates to the following lines in.editorconfig. Note thewarningsetting.dotnet_style_qualification_for_event = true:warning dotnet_style_qualification_for_field = true:warning dotnet_style_qualification_for_method = true:warning dotnet_style_qualification_for_property = true:warningTo ensure code style is enforced during the build, set the EnforceCodeStyleInBuild property in your
Directory.Build.props:<EnforceCodeStyleInBuild>true</EnforceCodeStyleInBuild> -
We allow builds with warnings on development machines. Why? Because you certainly don’t want to have a perfectly formatted build every time you want to run your tests or your apps.
-
However, in CI builds, we treat warnings as errors. This way, code with style issues won’t be merged. To detect continuous integration builds, use the ContinuousIntegrationBuild property or the specific environment variable of your CI pipeline.
<PropertyGroup Condition="'$(ContinuousIntegrationBuild)' == 'true'"> <TreatWarningsAsErrors>true</TreatWarningsAsErrors> </PropertyGroup> -
While this article focuses on code style and conventions, you should also enable code analysis for various rulesets. Check out Overview of .NET source code analysis for more details. We on the Metalama team are also using StyleCop, which is redundant with Rider/Resharper analysis but integrates directly with the C# compiler.
Avoid being too strict about whitespace violations. Requiring an exact number of whitespaces for a merge could lead to multiple rounds of whitespace fixing commits, which can slow down productivity. Remember, your ultimate goal is to improve productivity, not to achieve a whitespace-perfect codebase.
Step 4. Planning for Periodic Full Cleanups
At this point, your development and build pipeline should ensure that PRs are reasonably well-formatted before they undergo code review. While demanding perfection for each PR is impractical, formatting defects can accumulate over time, necessitating a thorough cleanup.
On the Metalama team, we perform a comprehensive cleanup immediately after the dev freeze milestone of each release, usually every 6 to 12 weeks. The goal is to periodically restore the codebase to perfect order.
Running the cleanup tool should be a non-event. It should be entirely deterministic, non-disruptive, and not cause any frustration.
You have two main options:
- dotnet format is a .NET SDK command-line tool that reformats code to align with
.editorconfigsettings. However, its capabilities are currently limited. For me, “good enough” means being entirely satisfied with the tool’s output, anddotnet formatisn’t quite there yet. - JetBrains offers two types of cleanup tools. You can use the interactive tool in ReSharper or Rider, or ReSharper’s CleanupCode command-line tool. The latter is free and doesn’t require a license for the entire team if all you need is code reformatting. This is what our team uses. You will need at least one license to set up the correct configuration.
To ensure all runs produce the same predictable output, create a script that runs the tool with the exact parameters. This output, termed the canonically formatted code, should be your gold standard.
From this point forward, no one should be blamed for reformatting code to its canonical form. Instead, the blame should be placed on the developer merging non-canonical code.
Step 5. Taking Code Validation to the Next Level
If you’ve successfully implemented all the above steps, congratulations! Your processes now ensure consistent adherence to the code style, making team members more confident in reformatting and refactoring code.
To further enhance codebase maintainability and readability, consider validating your codebase with more complex rules. For instance, enforcing that all classes implementing IFactory end with the *Factory suffix, or checking that no one uses the double type in the Billing namespace (you should use int or decimal for any money!). Consider writing architectural unit tests or using our tool Metalama to enforce naming conventions and verify dependencies.
For example, here is how you could enforce a naming convention using Metalama:
[DerivedTypesMustRespectNamingConvention( "*Factory" )]
public interface IFactory<T>
{
   T Create();
}
And here is how you could prohibit internal members of a namespace from being used from a different namespace:
namespace TheNamespace
{
    internal class Fabric : NamespaceFabric
    {
        public override void AmendNamespace( INamespaceAmender amender )
        {
            amender.Verify().InternalsCanOnlyBeUsedFrom( r => r.CurrentNamespace() );
        }
    }
}
Conclusion
Mastering code formatting is a crucial step towards creating a maintainable, team-friendly codebase. Adhering to and enforcing a particular style creates an environment that improves code-reading productivity, a critical factor considering that developers spend a whopping 80% of their time reading code. Consistent style also reduces merge issues and simplifies pull requests. A clean, well-maintained codebase is a pleasure to work with and the pride of every team member.

